Keycloak external auth — Google IDP, token exchange, and an Axum demo

Contents

  1. 1. OAuth with Google first
    1. 1.1. Initialize the OIDC client
    2. 1.2. Build the auth URL
    3. 1.3. Auth callback: exchange the code
  2. 2. Keycloak as identity broker
    1. 2.1. Keycloak configuration
    2. 2.2. Keycloak auth in the app
  3. 3. Option 1: token exchange
    1. 3.1. Keycloak settings
    2. 3.2. Code
  4. 4. Option 2: broker stored tokens
    1. 4.1. Keycloak settings
    2. 4.2. Code

Most of us have at least heard of OAuth2.

New to the vocabulary? Skim Authentication vs authorization — OAuth2, OIDC, JWT, and Keycloak for the basics and flows.

With Google as the IdP, the usual story: user hits the consent screen, comes back with an authorization code, you exchange it for tokens, then call Google APIs on the user’s behalf.

Rolling that by hand isn’t huge — but add Facebook, Instagram, and every other IdP and you don’t want N custom integrations. A central auth layer is the point. Here we use Keycloak as that layer.

If you can’t reproduce it locally, it’s hard to learn or debate the design. This walkthrough uses Rust/Axum + Keycloak, with docker-compose, Terraform, and shell scripts so you can replay the whole stack on a Mac. Repo: https://github.com/NewbMiao/axum-koans

OAuth with Google first

Before Keycloak, walk through plain Google OAuth so the brokered flow has something to compare against.

Prerequisite: a Google OAuth client clientId and clientSecret. See Create a Google Application in How to setup Sign in with Google using Keycloak.

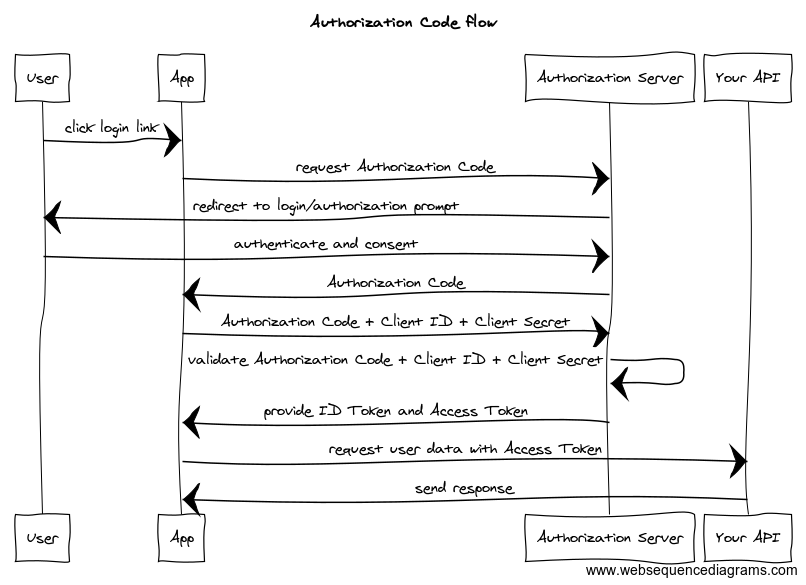
In the authorization code flow, the client and auth server mainly do two things:

  • Build an auth URL; after login, receive a code to exchange for tokens
  • In the callback, swap the code for credentials — typically accessToken (and often refreshToken)

Authorization Code flow for OAuth

You can wire this yourself; in practice people use an OIDC client (OpenID Connect on top of OAuth2 — standardized user identity for apps).

The shape is similar across languages. Below: the Rust oauth2 crate.

If Rust is new to you, lean on the inline comments in the snippets — they carry most of the narrative.

Initialize the OIDC client

1
2
3
4
5
6
7
8
9
10
11
12
13
14
15
16
17
18
// src/extensions/google_auth.rs@GoogleAuth::new
// OAuth authorization endpoint — used to build the auth URL with the right query params
let auth_url =
AuthUrl::new("https://accounts.google.com/o/oauth2/v2/auth".to_string()).unwrap();
// Redirect URI after login; Google sends the authorization code here
let redirect_url = RedirectUrl::new(config.redirect_url).unwrap();
// Token endpoint — exchange authorization code for tokens
let token_url =
TokenUrl::new("https://www.googleapis.com/oauth2/v3/token".to_string()).unwrap();

let client = BasicClient::new(
// Google OAuth client id/secret; web clients typically whitelist origin + redirect URIs
ClientId::new(config.client_id),
Some(ClientSecret::new(config.client_secret)),
auth_url,
Some(token_url),
)
.set_redirect_uri(redirect_url);

Build the auth URL

1
2
3
4
5
6
7
8
9
10
11
12
13
14
15
16
// src/extensions/google_auth.rs@GoogleAuth::auth_url
let (url, csrf_token) = client
// State generator for CSRF — validate state on the auth callback
.authorize_url(CsrfToken::new_random)
// Scopes: profile + email are enough for basic user info
.add_scope(Scope::new(
"https://www.googleapis.com/auth/userinfo.profile".to_string(),
))
.add_scope(Scope::new(
"https://www.googleapis.com/auth/userinfo.email".to_string(),
))
// Force consent screen so the user sees what the app is asking for
.add_extra_param("prompt", "consent")
// offline access → refresh token for long-lived access
.add_extra_param("access_type", "offline")
.url();

access_type=offline matters when the app needs long-lived access: access tokens expire; without a refresh token you’re back to nagging users to sign in again.

For hardening, state isn’t the only option — PKCE (Proof Key for Code Exchange) is in the repo if you want to trace it.

Auth callback: exchange the code

1
2
3
4
5
6
7
8
9
10
11
12
// src/extensions/google_auth.rs@GoogleAuth::get_tokens
// Validate state (and PKCE if enabled) — omitted here
// Exchange authorization code for tokens
let mut res = client.exchange_code(code);

// Async HTTP client — don't block the Axum runtime with sync I/O
let res = res.request_async(async_http_client).await?;

Ok(TokenInfo {
refresh_token: res.refresh_token().unwrap().secret().to_string(),
access_token: res.access_token().secret().to_string(),
})

Once local config matches the docs, hit http://localhost:8000/google/auth and run through the flow.

Keycloak as identity broker

Keycloak configuration

To put Keycloak in front of Google, add a Keycloak identity provider (IdP).

Terraform with the keycloak provider shows the same knobs you’d click in the admin UI — compare with How to setup Sign in with Google using Keycloak.

1
2
3
4
5
6
7
8
9
10
11
12
13
14
15
16
17
18
19
20
21
22
23
24
25
26
27
28
29
30
31
32
33
34
35
36
37
38
39
40
41
42
43
44
45
46
47
48
49
# Default admin-cli provider; you can use a dedicated client + client_secret instead
provider "keycloak" {
client_id = "admin-cli"
url = "http://localhost:8080"
username = "***"
password = "***"
}

# 1. Realm — isolated tenant (like a namespace for users, clients, IdPs)
resource "keycloak_realm" "realm_axum_koans" {
realm = "axum-koans"
enabled = true
}

# 2. Google IdP — needs Google OAuth client credentials

resource "keycloak_oidc_google_identity_provider" "google" {
realm = keycloak_realm.realm_axum_koans.id
# client_id / secret from TF variables
client_id = var.google_client_id
client_secret = var.google_client_secret
trust_email = true
# "*" = no hosted-domain restriction on who may use this IdP
hosted_domain = "*"
sync_mode = "IMPORT"
provider_id = "google"

default_scopes = "openid profile email"
}

# 3. OIDC client — your app talks to Keycloak (and Google via broker) through this
resource "keycloak_openid_client" "client_axum_koans" {
realm_id = keycloak_realm.realm_axum_koans.id
name = "axum-koans"
enabled = true


client_id = "axum-koans"
client_secret = "***"
standard_flow_enabled = true

access_type = "CONFIDENTIAL"
# OAuth redirect URI after Keycloak login
valid_redirect_uris = [
"http://localhost:8000/keycloak/login-callback"
]
web_origins = ["*"]
use_refresh_tokens = true
}

It looks verbose, but the comments mark the three real steps. Next: code against that realm.

Keycloak auth in the app

Once the realm exists, auth and token calls go through its issuer URL — Keycloak’s stand-in for Google’s auth server.

  1. Initialize the Keycloak OIDC client
1
2
3
4
5
6
7
8
9
10
11
12
13
14
15
16
17
18
// src/extensions/keycloak_auth.rs@KeycloakAuth::new

// issuer_url example: http://localhost:8080/realms/axum-koans

// Token URL, authorization URL, and redirect URI
let token_url = TokenUrl::new(get_url_with_issuer(
&config.issuer_url,
"/protocol/openid-connect/token",
))
.unwrap();
let auth_url = AuthUrl::new(get_url_with_issuer(
&config.issuer_url,
"/protocol/openid-connect/auth",
))
.unwrap();
let redirect_url = RedirectUrl::new(config.redirect_url).unwrap();
let client = BasicClient::new(client_id, Some(client_secret), auth_url, Some(token_url))
.set_redirect_uri(redirect_url);
  1. Build the auth URL

Mostly the same as the direct Google client — that’s the payoff of OIDC: one client shape, many issuers, consistent login UX, less bespoke security glue.

By default the browser lands on Keycloak’s login page with Google as an option. To skip straight to Google, use the client hint kc_idp_hint (Client-suggested Identity Provider).

1
2
// src/extensions/keycloak_auth.rs@KeycloakAuth::auth_url
client.add_extra_param("kc_idp_hint", "google")
  1. Auth callback: exchange the code

Same pattern as Google — omitted here.

You end up with Keycloak tokens. What if the app still needs Google tokens?

Two paths.

Option 1: token exchange

Token exchange swaps one token for another — here, Keycloak’s access token for Google’s external token.

Keycloak settings

Token exchange is still preview in Keycloak. Enable admin-fine-grained-authz,token-exchange in features (see the Keycloak docker-compose config).

1
2
3
4
5
6
7
8
9
10
11
12
13
14
15
16
# Ask the Google IdP for refresh tokens (needed for token exchange)
resource "keycloak_oidc_google_identity_provider" "google" {
...
# for token exchange to get google access token
request_refresh_token = true
}

# Allow token exchange from this client via fine-grained policy
resource "keycloak_identity_provider_token_exchange_scope_permission" "oidc_idp_permission" {
realm_id = keycloak_realm.realm_axum_koans.id
provider_alias = keycloak_oidc_google_identity_provider.google.alias
policy_type = "client"
clients = [
keycloak_openid_client.client_axum_koans.id
]
}

Code

1
2
3
4
5
6
7
8
9
10
11
12
13
14
15
16
17
18
19
20
21
22
23
24
25
26
let token_url =
format!( "{}/protocol/openid-connect/token",&self.config.issuer_url);
let response = Client::new()
.post(token_url)
.form(&[
// token exchange type
(
"grant_type",
"urn:ietf:params:oauth:grant-type:token-exchange",
),
// Keycloak access token to exchange
("subject_token", &access_token),
("client_id", &self.config.client_id),
("client_secret", &self.config.client_secret),
// We want a Google access token back
(
"requested_token_type",
"urn:ietf:params:oauth:token-type:access_token",
),
// External IdP alias configured in Keycloak
("requested_issuer", "google"),
])
.send()
.await?;
// json deserialized as access token
Ok(from_str(&response.text().await?)?)

You get a Google access token Keycloak obtained via the stored Google refresh token. Hold a Keycloak access token → call Google APIs. Straightforward on paper.

Option 2: broker stored tokens

What about the Google refresh token itself?

Some clients refresh Google access tokens on their own. They shouldn’t need a Keycloak access token first just to fish out Google’s refresh token.

Use Retrieving external IDP tokens: Keycloak persists external tokens at login; grant the user broker read token and you can read stored external access + refresh tokens with a Keycloak access token.

Keycloak settings

1
2
3
4
5
6
7
8
resource "keycloak_oidc_google_identity_provider" "google" {
...
# for retrieve idp token (with refresh token)
# Persist IdP tokens at login
store_token = true
# Grant broker read-token role on new users
add_read_token_role_on_create = true
}

Note: in Keycloak 21.1.1, add_read_token_role_on_create didn’t show in the admin UI but the admin API accepted it — awkward if you’re clicking instead of Terraform-ing.

Code

Fetch stored IdP tokens; point at the broker endpoint for Google:

1
2
3
4
5
6
7
8
9
10
// src/extensions/keycloak_auth.rs@KeycloakAuth::get_idp_token
let token_url = format!( "{}/broker/google/token",&self.config.issuer_url);
let response = Client::new()
.get(token_url)
.bearer_auth(access_token)
.header(CONTENT_TYPE, HeaderValue::from_static("application/json"))
.send()
.await?;
let res = response.text().await?;
Ok(from_str(&res)?)

Exposing refresh tokens to end users needs extra guardrails — tighten who can hit the broker read-token API.

After you bring the stack up locally, try http://localhost:8000/keycloak/login.


That’s the Keycloak-shaped way to manage external auth — notes from wiring it in production-minded experiments. Repo again for a full replay: https://github.com/NewbMiao/axum-koans

Questions? Leave a comment below or email: newbvirgil@gmail.com